I did a repaint for the Class 170 and was asked about how I did it and how to do a repaint in general, so here is how. Please note while the files and such are now specific for the Class 170, you can take the advice in general for all trains. The texture sets will look a bit different and the file structure often is different with locos from different developers, but it should work ok.
- You need the RSBin tool: http://uktrainsim.com/filelib-info.php?form_fileid=17703
RSBin tool enables you to open the RW graphics files and export them to .dds files - there are plugins for Photoshop and Gimp which will open it directly, unfortunately they don't work on 64bit Versions of Windows as it seems. So that is what we need DXTBmp for, this can open any dds file and make them to a bmp. Open that with any programme you like, like Photoshop or The Gimp. In theory RWTools is also able to convert the texture files, but it does not work for me.
Anyway, let's get started:
At first I looked which folder the different engines are placed in, since it's from Thomson, go to: Assets\Thomson\Class170Pack01\
We are looking for a train, so RailVehicles\Class170 is the next stop.
Inside you have a bunch of folders which represent the different liveries of the train, e.g. FS, Scotrail, SP, ...
Since the SP livery already had some red colors on it, I chose that one as my base product. I simply copied the SP folder within windows and renamed it from "SP - copy" to DB_Repaint.
Next step: open the train's .bin files in RWTools. There are three of them for the different coaches, Class170_DMCL.bin, Class170_DMSL.bin and Class170_MSL.bin. At the top you will find these entries:
<DisplayName>
<Localisation-cUserLocalisedString>
<English d:type="cDeltaString">Class170 DMOSLA SP</English>
<French d:type="cDeltaString"></French>
That is the name it will appear with in the editor, since there is already an SP livery you need to rename the new one, I changed it from SP to DB.
<DisplayName>
<Localisation-cUserLocalisedString>
<English d:type="cDeltaString">Class170 DMOSLA DB</English>
<French d:type="cDeltaString">Class170 DMOSLA DB</French>
I also like to fill out all the localisation entries, don't know if it is really necessary but it can't hurt either
Then you need to go carefully go through the file and look for all path references to the livery and adjust them to your new files, for example this one:
<NumberingList>
<cCSVContainer>
<CsvFile d:type="cDeltaString">Thomson\Class170Pack01\RailVehicles\Class170\SP\Engine\class170_DMCL_numbers</CsvFile>
</cCSVContainer>
There are multiple of those entries and there are different spots for them on different engines, you may not need to change all of them, depending on what you actually change on the engine. I find it more convenient to change them all though.
Enough file hacking for now, time to look into the textures folder. Every train or wagon is built a bit different, uses different texture sets and styles, so the next steps are now only specific for the Class 170, but apply generally to all trains.
Textures in RW are all named .TcPcDx - The Class 170 has a lot of them, not all are really necessary for this repaint. You can see which are referenced in the .GeoPcDx files in the engines folder if you like.
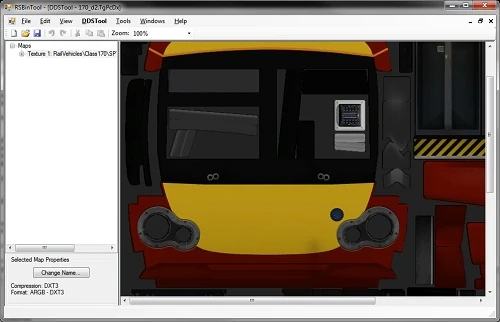
Time to load up RSBinTool and see what the textures look like. As it turns out, you need 170_d1_nm.TgPcDx, 170_d1_nmc.TgPcDx and 170_d2.TgPcDx.
The first two are the outside of the train and pretty much look the same, I think one is for SLA and one for the SLB variant, but the SP livery has no marked first class, so they are really the same. Makes the paint job a little bit easier on this one... 170_d2 is the front of the train.
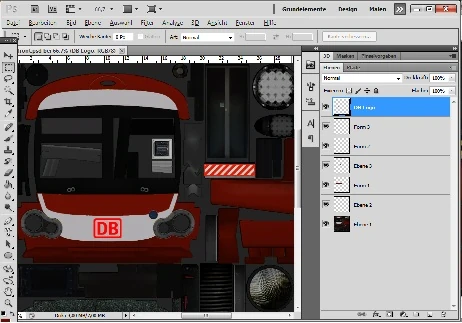
Now export it to a dds file, from the DDSTool menu and save it somewhere. Open the .dds file with DXTBmp and in the menu choose Image -> Send to Editor (if you haven't setup the editor yet, choose Prefs -> Select Editor, I chose MSPaint, but you can also put it directly to Photoshop are whatever you want to use). Then I load the image up in Photoshop and start my paint job. Add a little color here and there, put in some new layers, add a logo, just whatever you want to do with it.
Here is my example DB reskin:
As you see I didn't change much, but it still looks like a new train
When you are done reskinning or just want to know how your changes look like in the game just to do the above process reverted. I change my file in PS as bmp, open it with MSPaint (while still having the norm.bmp open in MSPaint!), I press ctrl+a to select all in my repaint.bmp, copy and paste it over the norm.bmp and save that one. Then in DXTBmp select Image -> Reload after Edit and you will see it loads in your new skin. Save it as .dds over the previous one, go back to RSBinTool, select DDSTool -> Import DDS, and then select File -> Save As and save it over the one in your repaint's texture folder. Voilà, you have a new skinned train!
Just remember to clear your blueprint cache after you have changed anything on the textures, and RW only loads them on startup so you need to close and open it every time you want to have a look on your changes.
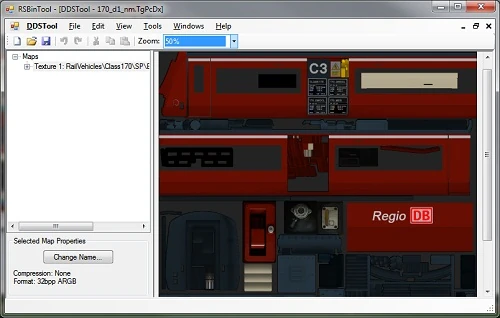
And just to give you an impression of the side texture:

If you can't really identify which part of the texture is which one ingame it helps me to place some specific colored squares or something on the different parts and look at them in the game, the 170 is relatively easy built, there are more complicated texture sets for Railworks.
As for time: the reskinning including the new headcodes (look at the destination_a.TgPcDx files) took about 8-10 hours including all testing, converting, loading and such.
I hope this will get you guys started, if you have any questions leave them in the comment area below. If you are interested in getting the repaint, go to Rail-Sim.de or UKTS 26212.